1) Remove the bolts attaching the brake to the front fork and slide it out from the rotor. Remove the brake pads. 1a) If the brake line is still filled with fluid, depress the brake lever over and over until the piston "pops" out of its cylinder. Have a rag ready to catch the escaping fluid. CAUTION:- brake fluid will mar painted parts, so keep it clear of your tank and other such surfaces. Remove the brake line and take the brake to your bench. 1b) If your brake line does not contain fluid or just aren't working, remove the brake line from the brake and take the brake to your bench. Using about 80-100 psi, force compressed air into the line connection hole. CAUTION:- place an old rag where the piston will exit and keep your fingers clear because the piston may fly out under some force.
2) Wipe the internal surface of the
cylinder and drain any fluid left in the brake. Clean off the
cylinder with fine steel wool and inspect for damage. Some pitting
can be expected but massive holes will cause fluid leakage after
reassembling. Its your call if a badly damaged piston needs
replacing. 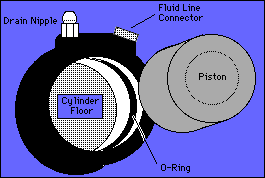 Remove
the rubber (square) o-ring from inside of the cylinder. A dental
pick works well here.(ask your dentist for an old worn out one)
Use your fingernail to scrape any scale that has built up on the
o-ring. Replacement is almost never warrented even on older worn
bikes! Now to where the problem arose, the o-ring groove in the
cylinder wall. Scale seems to build up here and forces the o-ring
outwards(actually inwards) and the piston can no longer retract.
Use your pick to scrape out the groove but be careful not to gouge
the wall of the cylinder. Clean any scale that remains and blow
out the cylinder with compressed air.
Remove
the rubber (square) o-ring from inside of the cylinder. A dental
pick works well here.(ask your dentist for an old worn out one)
Use your fingernail to scrape any scale that has built up on the
o-ring. Replacement is almost never warrented even on older worn
bikes! Now to where the problem arose, the o-ring groove in the
cylinder wall. Scale seems to build up here and forces the o-ring
outwards(actually inwards) and the piston can no longer retract.
Use your pick to scrape out the groove but be careful not to gouge
the wall of the cylinder. Clean any scale that remains and blow
out the cylinder with compressed air.
3) Remove the drain nipple from the body of the brake. This
sounds easy but can present quite a problem. Use a good box wrench
and place the brake in a vise. A strong pair of vise-grips may be
your last resort. This bolt rusts in place because of its close
contact with the brake fluid. Brake fluid is "hydrophillic" and
will take in water right from the air to generate rust on this
little vented bolt. Once removed, use a wire to clean out the vent
that goes through the bolt.
4) Screw the drain nipple back in and replace the o-ring.
Coat the inside of the cylinder and o-ring with freash brake fluid
(DOT #3) and push the piston back in. You should be able to slide
the piston in and out with your hand, if not, remove and check the
groove again.
5) Drain the old brake fluid from the handlebar resevoir
and line by pumping the lever. Check the brake pads for wear and
replace if needed. Install the disks, reconnect the brake line to
the brake and remount the brake to the front forks. Fill the
resevoir with fluid and open the drain nipple bolt a few turns.
Pump the brake lever and refill the resevoir when needed. Keep
pumping until fluid comes out of the drain nipple.
6) You must now ensure that no air is left in the system,
just fluid. Connect about 6 inches of transparent hose (aquarium)
to the nipple bolt and tighten. Depress the lever and then open
the nipple bolt. If only fluid enters the tube, you are done. If
some air escapes, tighten the nipple bolt while depressing the
lever. Release the lever, depress it again and then open the
nipple bolt. Repeat this until no air bubbles come out. Don't
forget to tighten the nipple bolt and refill the resevoir one last
time.
Master
Cylinder
If the above procedure does not clear up the problem of "sticky"
brakes it may be your master cylinder. The master cylinder
consists of a lever driven piston and a resevoir of brake fluid.
Due to contamination over time, the brake fluid within the master
cylinder can turn to "mud" and inhibit the proper action of the
piston.
1) Drain the brake fluid from the resevoir and discard.
Disconnect the brake line from the handlebar assembly and catch
any fluid that leaks out.
CAUTION:-
brake fluid will mar painted parts, so keep it clear of your tank
and other such surfaces. Remove the brake assembly from the
handlebars.
2) Remove the hand lever. Carefully remove the rubber
sleeve that seals the piston to the assembly (this part is most
often damaged from mishandling). The piston is held in by a
circlip and must be removed by a pair of circlip pliers. The depth
of the recess which holds the circlip requires circlip pliers with
extremely long jaws. Normally the removal of the circlip is
the largest task in the whole disassembly process!
3) Remove the piston assembly and clean.
CAUTION:
the end of the piston will have a "leaf spring" that covers
several small fluid entry/exit holes that can be damaged easily. A
blast of compressed air goes a long way to clean within these
small recesses.
4) Reassemble the master cylinder and fill with clean, new
DOT 3 fluid.
I have found that a change of brake fluid and system flush will
prevent most problems if done every spring.